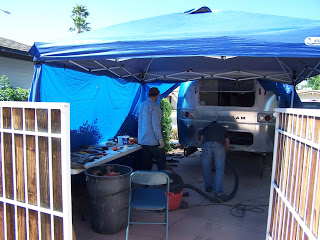
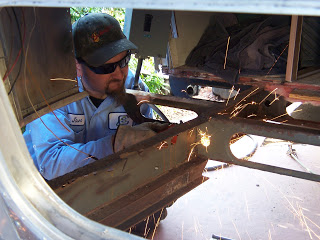
You can now see extensive damage to the frame and wood flooring. The flooring will need to be replaced and all areas of the frame with rust will need to be repaired or replaced. Before any of the rear end was disassembled it looked like it was in OK shape. But when parts are removed piece by piece it becomes very clear the amount of damage that was hidden


This is probably the best pictorial tutorial I've seen on this rear end process. I am working my way through this with a 1972 Overlander and attempting to document it step by step. GREAT JOB! And thanks for taking the time to document.
ReplyDeleteThanks! It makes us both very happy to hear we are helping others! When I started researching rear end separation it was almost impossible to find sites with pictures. There were a lot of sites with text but for someone like me I need to actually see the process to truly understand it.
DeleteYep me as well. Lots of folks took pics - from an inch and a half away. Saturday I start deconstructing the outside stuff. Have pulled the bumper and bumper box lid. I hope to get to the point of pulling the floor, but I have time. I also want to add that I appreciate that you folks reused the old bathroom components I am doing the same. I built bikes for a 36 years as a hobby and learned that I like things stock. The rest of my Overlander is in great shape an it is a one owner before me. One thing I wanted to mention I that I really love your sofa design, did you put something on paper or just wing it? You mention an email address in some of your notes but I did not see one.
ReplyDeleteDave
Yes, its mike@platt-family.net. But as for the bathroom, we are going to remove it and build a custom bath :/. it was a hard decision to make. I do like the layout of the original bathroom but it just doesn’t go with the rest of the improvements. But don’t worry, we found a new home already for all the original pieces. They will be installed into another 1972 sovereign :)
Deletewhat process did you use to shine your airstream?
ReplyDeleteFirst I used aircraft stripper to remove the clear coat. I picked some up at auto zone and purchased some brushes to apply. Use heavy duty rubber gloves to protect yourself when you brush it on. After it bubbles up spray it off (I used a pressure washer). Once the clear coat is removed it’s ready for buffing. I used a 7” buffing pad on a rotary polisher with Nuvite F7 polishing compound. I tried multiple compounds and stand by Nuvite 100%. Nuvite is a little $$ but a little goes a long and personally I believe it to be at least 3x as affective then other brands on the market. Next you’ll need a Cyclo orbital polisher. It’s the only way to remove the swirls left by the 7” buffing pad. I purchased one used on craiglist.
DeleteTo clean the black residue left behind by the polish use about 2 ounce of vinegar in a spray bottle mixed with water and micro fiber rags. For tuff spots use terry cloth but be carful because terry cloth will leave scratches. The best way I found to remove residue is to cover the Cyclo buffer with the microfiber cloth. It works really well and is quicker than doing it by hand. Here is a list of what I used:
Buffing pad: Presta Double or single sisded BLACK wool cutting pad
http://www.amazon.com/PRESTA-Single-Sided-Cutting-Buffing/dp/B0082LFSPG
Buffing pad attachment: Quick connect adapter
http://www.autodetailingwarehouse.com/dewalt-polisher-makita-polisher-drive-adapter-DP1900.html
7in Sander/Polisher
http://www.homedepot.com/p/Makita-7-in-Sander-Polisher-9227C/100594840
Cyclo buffer:
http://www.eastwood.com/cyclo-model-5-dual-headed-polisher.html?srccode=ga220010&gclid=CMWBrfz24L0CFS1eOgodX3oAyw
Nuvite polish: F7 cut and finish with S
http://www.aircraftspruce.com/pages/cs/cleaners_znuvite/nuvitenushine.php
Terry cloth and Microfiber cloth
Do you have any recommendations on things you wish you new before you started? A list of issues to watch out for in this process. This work is really hard to find info on like you said. Thanks for the photos.
ReplyDelete